Russ's Little Subie Page
Those Climate Control Panel Bulbs
A 2006 update... apparently these bulbs, as well as the ones in the instrument cluster, buttons, and even the shift console, sometimes fail by... not quite failing. They'll go out, and then they'll come back. Or you get mad and whack something in the vicinity and they come back on. Well, this means the filaments are going bye-bye folks. It will be a long time before the bulb goes out "for real." Just replace the bugger.
And you thought that when those lights went out in the climate control panel, you were looking at replacing the whole thing!!! Well, you still might, but if you're talking about a 1995-1999 Legacy (and maybe some other years and Subies) you sure aren't. Go grab the Haynes manual for the 1990-1998 Legacy and find out if your climate control panel looks like mine. If it does, we're in business...
I AM MAKING NO REPRESENTATIONS AS TO WHETHER YOU WILL SUCCEED. THIS WORKED ON MY CAR AND IF YOU SCREW YOURS UP I WILL BEAR NO CONSEQUENCES WHATSOEVER!!!!
Now that that's out of the way...
Before anybody wonders whether this works, I ripped my dash open to generate this info!!! First, use the Haynes (or other applicable) instructions to get the bezel around the climate control panel out of the way. Then remove the four screws that anchor the panel. Next:
Issue 1: The temperature control cable. There are two ways to deal with this. The obvious (and hard) way is to try to detach the cable from the climate control panel itself. The not so obvious, and better way is to detach it at the other end instead. If you stick your head under the dash, passenger side, and look in towards the center console, you'll find that "other end" directly above the vent outlet. You can confirm you've found it by moving the temperature control slide back and forth and watching the far end of the cable move in response. The end under the dash has a round, open eyelet at the end of the cable that sits on a post-- unsecured, easy to slide off. The cable itself is held in place by a clip-- no screwdriver needed to get it off. Make sure you note the position of the cable relative to the clip before removal. One note-- when you put all this back together, you'll need to fish this cable back down here. Not a big deal, but easier if you note what you're doing in advance.
Issue 2: The bulbs. Easy stuff first. There are three bulbs, 2 "short & stubbies" and 1 long one, here are the Subaru part numbers: The long one: 72351AC051 (formerly -050) The short ones: 72351AC061 I paid $2.36 a bulb, for a total cost of $7.08. And now for the pictures:
Top-down rear view:
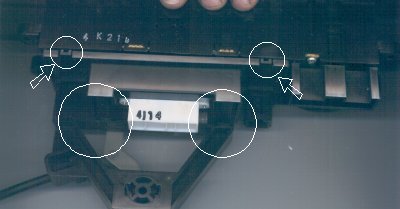
The unit probably looks sealed. It isn't. The white circles with the arrows pointing at them show 2 tabs that you have to push towards the rear of the unit. Once you push these tabs, the piece of plastic they're part of-- which is a circuit board cover-- slides straight up. There are lesser (friction, not lock-type) tabs where the two big circles are (no arrows). You might have to pry these back (again, towards the rear of the unit) to get the cover to move up. It doesn't take effort, just finesse.
Next picture, also a top-down rear view:
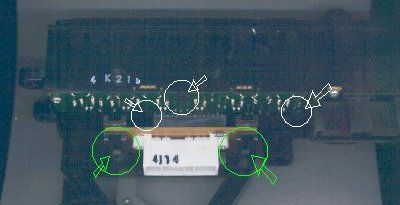
The three white circles (w/arrows) show where the bulbs are located. These things are really small and to get them out you give them about a 1/8 turn-- again, finesse, not effort-- with a Phillips screwdriver, counterclockwise, at which point you just kind of shake them out. The bulb on the far right in the pic is the long one. Note that the bulb on the far left of the pic is actually *behind* the circuit board with the white harness connector on it. To get at this bulb, you'll have to do a little more work. See the big green circles? There's a tab in each. If you push both tabs back (towards the rear of the unit), you can slide this circuit board straight up-- just enough to get to the bulb. DO NOT TRY TO SLIDE THE BOARD OUT OF ITS MOUNTS. There is a soldered-on ribbon cable that isn't meant to be bent and flexed a lot. Just slide the board up enough so that you can get a screwdriver at the bulb.
Finally, the last pic, for clarification (rear view):
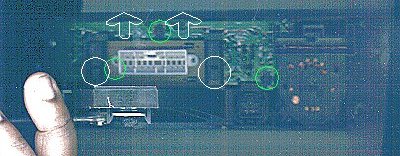
This is a straight-on rear view of the unit with the aforementioned cover removed. The green circles show the locations of the bulbs (again note that the rightmost bulb is where the long one goes, and the leftmost bulb is behind the harness connector). The white circles show the locations of the tabs that have to be pushed back in order to wiggle the harness connector up, so that you can get a screwdriver to the leftmost bulb. Once you've got the bulbs replaced, installation process is the reverse of removal. Hope this helps!!!
This page last updated 8/6/2000!